Tags: Visual edit apiedit |
m (→Etrian Odyssey 2 Untold: Superfluous to put this in bold again.) Tag: rte-wysiwyg |
||
| Line 20: | Line 20: | ||
Death Wall is an FOE encountered on B3F of [[Ginnungagap]]. When seen from the front, it seems like any normal wall on the floor (you are still able to distinguish it though, as there are small gaps on its sides that are not present on a normal wall, plus you still get the characteristic F.O.E audio cue when it spots you), and you are unable to track it on your map while it remains immobile. |
Death Wall is an FOE encountered on B3F of [[Ginnungagap]]. When seen from the front, it seems like any normal wall on the floor (you are still able to distinguish it though, as there are small gaps on its sides that are not present on a normal wall, plus you still get the characteristic F.O.E audio cue when it spots you), and you are unable to track it on your map while it remains immobile. |
||
| − | As soon as it spots your party, the Death Wall will start chasing you. While it will not move if you are looking directly at it, this enemy is able to move 2 steps at once, meaning that escaping it will be a hard task. Plus, if several of these creatures are chasing you, they will work together to ambush you. Be careful not to be cornered while evading this enemy, as [[Ariadne Thread]]s are not usable on this floor the first time you visit it. Should you be cornered by it, you can either use a Return Flute to restart the challenge, or engage it in combat. |
+ | As soon as it spots your party, the Death Wall will start chasing you. While it will not move if you are looking directly at it, this enemy is able to move 2 steps at once, meaning that escaping it will be a hard task. Plus, if several of these creatures are chasing you, they will work together to ambush you. Be careful not to be cornered while evading this enemy, as [[Ariadne Thread]]s are not usable on this floor the first time you visit it. Should you be cornered by it, you can either use a Return Flute to restart the challenge, or engage it in combat. |
In combat, the Death Wall is a very dangerous enemy. Since you are locked away on this floor until you clear it for the first time, it's best to avoid confrontation, especially against a group of them. Should you find yourself in need to kill it, the monster is weak against elemental attacks, while resistant to slash, bash and pierce attacks. It is also immune to most status effects, and resistant against all binds. |
In combat, the Death Wall is a very dangerous enemy. Since you are locked away on this floor until you clear it for the first time, it's best to avoid confrontation, especially against a group of them. Should you find yourself in need to kill it, the monster is weak against elemental attacks, while resistant to slash, bash and pierce attacks. It is also immune to most status effects, and resistant against all binds. |
||
| − | During the battle, the Death Wall has a passive effect called '''Thousand Eyes''' which prevents you from running away from the battle. The only way to escape from it is using a Return Flute. If you don't have any, your party will be forced to fight it until death comes to either side. It can also attack with '''Crush''', which deals heavy damage to the entire party, and '''Reflect Guard''', which will block any attacks done to it for a turn, and launch a party-wide counter for each attack it takes. While it uses |
+ | During the battle, the Death Wall has a passive effect called '''Thousand Eyes''' which prevents you from running away from the battle. The only way to escape from it is using a Return Flute. If you don't have any, your party will be forced to fight it until death comes to either side. It can also attack with '''Crush''', which deals heavy damage to the entire party, and '''Reflect Guard''', which will block any attacks done to it for a turn, and launch a party-wide counter for each attack it takes. While it uses Reflect Guard, it is possible to run away from it. |
=== Skills === |
=== Skills === |
||
Revision as of 17:17, 23 May 2016
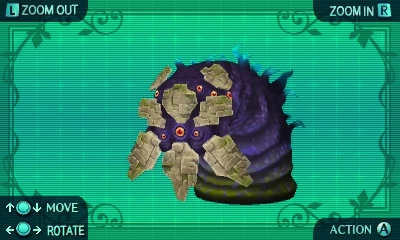
Death Wall is a F.O.E monster encountered exclusively on Etrian Odyssey 2 Untold: The Fafnir Knight. It can be found on the 3rd floor of the Ginnungagap.
This bizarre, slug-like creature is encountered by the adventurers during the trials of the Fafnir. It attempts to ambush the player's party by disguising itself as a wall, stalking the adventurers through the ruins until they manage to corner their prey, before mercilessly crushing them. They also use their many eyes to prevent their victims from escaping from battle, making them extremely dangerous enemies.
Etrian Odyssey 2 Untold
| Death Wall | |
| |
| Description | |
|---|---|
| It is disguised as a wall, ready to prey on adventurers. It's gaze can Immobilize you! | |
| Enemy Data | |
| HP | 8834 |
| ATK | 40 |
| DEF | 35 |
| Skills | Thousand Eyes, Crush, Reflect Guard |
| Items | Rigid Fragment |
| Weakness | Elemental Attacks |
| Resistance | Physical Attacks, Instant Death, All Binds |
| Immune | Stun, Petrification, Fear, Sleep, Panic, Paralyze |
Death Wall is an FOE encountered on B3F of Ginnungagap. When seen from the front, it seems like any normal wall on the floor (you are still able to distinguish it though, as there are small gaps on its sides that are not present on a normal wall, plus you still get the characteristic F.O.E audio cue when it spots you), and you are unable to track it on your map while it remains immobile.
As soon as it spots your party, the Death Wall will start chasing you. While it will not move if you are looking directly at it, this enemy is able to move 2 steps at once, meaning that escaping it will be a hard task. Plus, if several of these creatures are chasing you, they will work together to ambush you. Be careful not to be cornered while evading this enemy, as Ariadne Threads are not usable on this floor the first time you visit it. Should you be cornered by it, you can either use a Return Flute to restart the challenge, or engage it in combat.
In combat, the Death Wall is a very dangerous enemy. Since you are locked away on this floor until you clear it for the first time, it's best to avoid confrontation, especially against a group of them. Should you find yourself in need to kill it, the monster is weak against elemental attacks, while resistant to slash, bash and pierce attacks. It is also immune to most status effects, and resistant against all binds.
During the battle, the Death Wall has a passive effect called Thousand Eyes which prevents you from running away from the battle. The only way to escape from it is using a Return Flute. If you don't have any, your party will be forced to fight it until death comes to either side. It can also attack with Crush, which deals heavy damage to the entire party, and Reflect Guard, which will block any attacks done to it for a turn, and launch a party-wide counter for each attack it takes. While it uses Reflect Guard, it is possible to run away from it.
Skills
- Crush (uses ???): Deals heavy bash damage to the entire party
- Reflect Guard (uses ???): Blocks all attacks for one turn and unleash a powerful counter each time the boss is damaged.